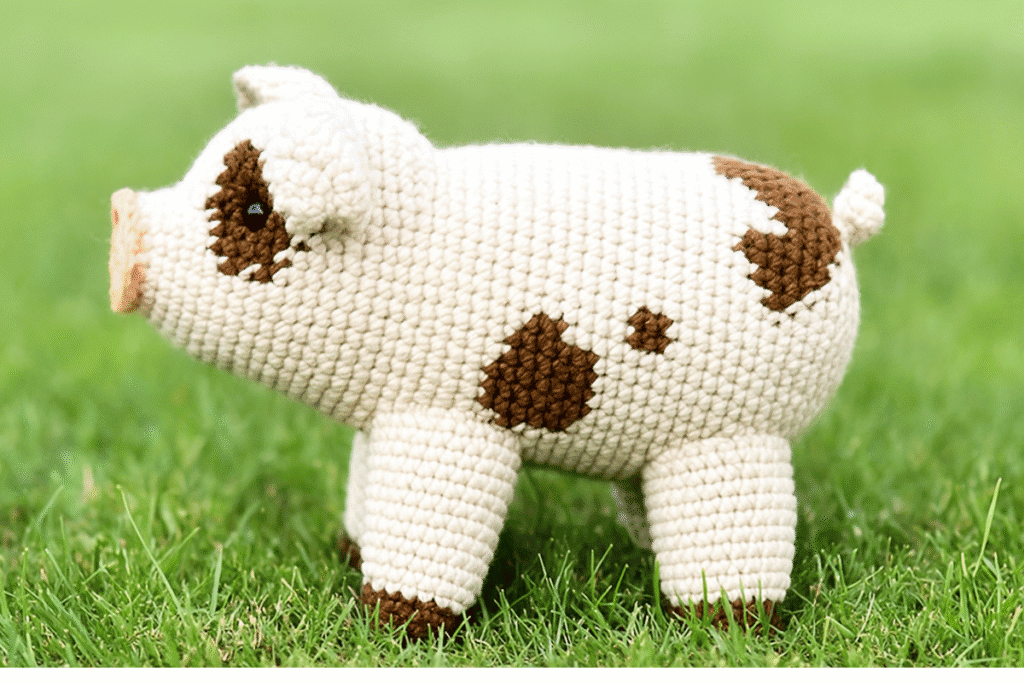
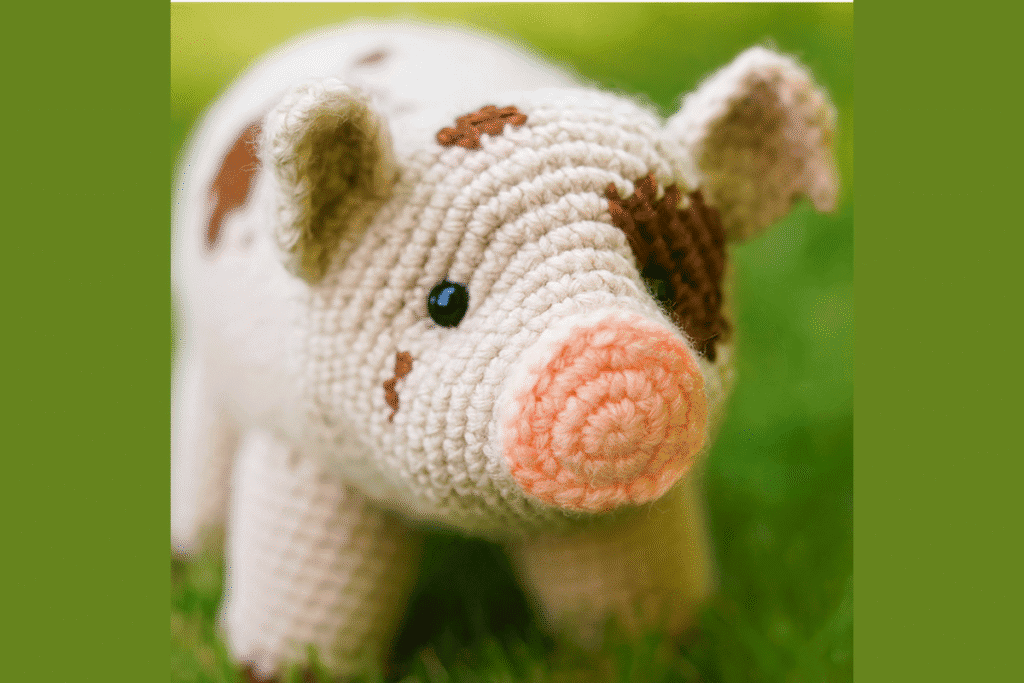
Easy Crochet Pig Pattern
This easy crochet pig pattern is a fun beginner crochet pattern. You can use it with some of our other farm animals to make crochet toys for kids.
Check out Today’s FREE Crochet Pattern:
Table of Contents
Supplies for Crochet Pig Pattern
- 4mm Crochet hook
- Yarn of choice
- Safety eyes
- Needle
- Stitch Marker
Abbreviations
Ch = chain
Sc = single crochet
Dc = double crochet
Dc dec = double crochet decrease
Slp st = slip stitch
Sk = skip
FO = finish off
Rep = repeat
Dec = decrease
PM = place marker
2x, 3x, etc = 2 times, 3 times, etc
Nose / Face / Body
R1: With color A, ch 3
R2: Work 2 sc in the 2nd chain from the hook. Make 4 sc in the last chain. Rotate your work to crochet along the bottom of the foundation chain, then place 2 sc in the same chain as the first 2 sc. (8 sts)
R3: Work 2 sc in each of the first 5 stitches, sc in the next stitch, make a loose slip stitch in the following stitch, then sc in the final stitch. (13 sts
R4: Work 3 dc in the first stitch, then sc in the next 3 stitches. Repeat from * to * around, and remove the marker (do not work the final sc).
SWITCH to color B for your crochet pig pattern
R5: Replace the marker and, working in BLO, sc dec, 2 sc in the next stitch, sc in the next 2 stitches, sc dec, sc in the next 3 stitches, sc dec, sc in the next 2 stitches, 2 sc in the next stitch, sc dec, then sc in the last 2 stitches. (17 sts)
R6: Working in both loops, make 2 sc in each of the first 2 stitches, sc in the next 10 stitches, 2 sc in each of the next 2 stitches, sc in the next stitch, then sc dec. (20 sts)
R7: Sc in the first 6 stitches, make a loose slip stitch in the next 7 stitches, then sc in the final 7 stitches. (20 sts)
You may notice at this point that your crochet pig pattern snout looks a bit flat and undefined.
R8: Reattach Color A to the front loops of Round 4 (at the start of the round).
Slip stitch in the first 2 loops, ch 1, slip stitch in the next 6 loops, ch 1, slip stitch in the following 6 loops, ch 1, then slip stitch in the last 5 loops. Fasten off.
R9: Tie the two yarn ends securely and weave them in, or use your crochet hook to pull them to the back and tuck them inside the snout.
R1:0 *Sc in the first 3 stitches, 2 sc in the next stitch, sc in the following stitch, 2 sc in the next stitch, sc in the next 8 stitches, repeat from * to , then sc in the last 3 stitches. (24 sts)
R11: Work 2 sc in the first stitch, sc in the next 3 stitches, then 2 sc in the next stitch, sc in the following 2 stitches; repeat from * to * six times, and sc in the last 2 stitches. (31 sts)
R12: Work 2 sc in the first stitch, sc in the next 3 stitches, then 2 sc in the next stitch, sc in the next 2 stitches; repeat from * to * six times, and sc in the final 2 stitches. (31 sts)
R13: Sc in the first 2 stitches, 2 sc in the next stitch, sc in the next 11 stitches, then 2 sc in the next stitch, sc in the following stitch; repeat from * to * for a total of 3 times, and sc in the last 11 stitches. (35 sts)
R14: *Sc in the first stitch, 2 sc in the next stitch, sc in the next 5 stitches, then 2 sc in the next stitch, sc in the following stitch, 2 sc in the next stitch. Sc in the next 20 stitches, repeat from * to , then sc in the last 2 stitches. (40 sts)
R15: Sc in the first 16 stitches, sc dec, sc in the next 2 stitches, then 2 sc in the next stitch, sc in the next 2 stitches; repeat from * to * for a total of 3 times. Work another sc dec, then sc in the last 9 stitches. (41 sts)
R16: Sc in the first stitch, [sc dec] twice, sc in the next 7 stitches, 2 sc in the next stitch, sc in the next 2 stitches, sc dec, sc in the next 2 stitches, then 2 sc in the next stitch, sc in the next 2 stitches; repeat from * to * three times. Sc in the next 3 stitches, sc dec, sc in the next 2 stitches, 2 sc in the next stitch, and sc in the last 5 stitches. (42 sts
R17: Sc in each stitch around. (42 sts)
R18: Sc in the first 14 stitches, then 2 sc in the next stitch, sc in the next 2 stitches, 2 sc in the next stitch. Sc in the next 11 stitches, repeat from * to * once more, then sc in the last 9 stitches. (46 sts)
R19: Sc in each stitch around. (46 sts)
Your eyes will go between rounds 15 and 16. Position the left eye so it sits between and covers the decreases on the left side of the face, and place the right eye just above the decreases on the right side.
R20: Sc in the first 2 stitches, then 2 sc in the next stitch, sc in the next 4 stitches; repeat from * to * a total of 4 times. Sc in the next 9 stitches, then repeat from * to * 3 more times. (53 sts)
R21: Sc in the first 7 stitches, then 2 sc in the next stitch, sc in the next 4 stitches, 2 sc in the next stitch. Sc in the next 33 stitches, repeat from * to * once more, then sc in the last stitch. (57 sts)
R22: Sc in the first 19 stitches, sc dec, sc in the next 10 stitches, sc dec, sc in the next 11 stitches, sc dec, sc in the last 11 stitches. (54 sts)
R23: Sc in the first 20 stitches, sc dec, sc in the next 18 stitches, sc dec, sc in the last 12 stitches. (52 sts)
R24: Sc in each stitch around. (52 sts)
R25: Sc in the first 2 stitches, 2 sc in the next stitch, sc in the next 3 stitches, 2 sc in the next stitch, sc in the next 19 stitches, sc dec, sc in the next 5 stitches, sc dec, sc in the last 17 stitches. (52 sts)
R26: Sc in the first 23 stitches, [dc dec] 7 times, sc in the next 8 stitches, 2 sc in the next stitch, sc in the next 2 stitches, 2 sc in the next stitch, sc in the last 3 stitches. (47 sts)
R27: Sc in the first 13 stitches, 2 sc in the next stitch, sc in the next 2 stitches, 2 sc in the next stitch, sc in the next 20 stitches, 2 sc in the next stitch, sc in the next 3 stitches, 2 sc in the next stitch, sc in the next 4 stitches, 2 sc in the last stitch. (51 sts)
R28: Sc in the first 11 stitches, 2 sc in the next stitch, sc in the next 3 stitches, 2 sc in the next stitch, sc in the next 3 stitches, 2 sc in the next stitch, sc in the next 4 stitches. Switch to FLO, then 2 sc in the next stitch, sc in the next 4 stitches twice, 2 sc in the next stitch. Return to both loops and sc in the last 17 stitches. (58 sts)
R29: Sc in each stitch around. (58 sts)
R30:. Sc in the first 29 stitches, 2 sc in the next stitch, sc in the next 8 stitches, 2 sc in the next stitch, sc in the last 19 stitches. (60 sts)
Stuff the pig’s head firmly. The shape may puff out a little here, but you can refine it later with simple needle shaping once the entire pig bean is finished.
R31-48. Sc in each stitch around. (60 sts)
R49: Sc dec, sc in the next 9 stitches; repeat 6 times, then sc in the last 3 stitches. (54 sts)
R50: Sc in each stitch around. (54 sts)
R51: Sc dec, sc in the next 7 stitches; repeat around. (48 sts)
R52: Sc dec, sc in the next 6 stitches; repeat around. (42 sts)
Stuff the rest of the pig firmly.
R53: [Sc dec, sc in the next 5 stitches] 4 times, ch 9, sl st in the 2nd ch from hook, sc in the next ch, 2 sc in each of the last 6 ch (tail complete!). Repeat the bracketed section 2 more times. (36 sts)
Note: If following these directions places the tail off-center from the snout, adjust the bolded section so the tail is centered on the body in relation to the face.
R54: Sc dec, sc in the next 4 stitches; repeat around. (30 sts)
R55: Sc dec, sc in the next 3 stitches; repeat around. (24 sts)
R56: Sc dec, sc in the next 2 stitches; repeat around. (18 sts)
R57: Sc dec, sc in the next stitch; repeat around. (12 sts)
R58: Sc dec around. (6 sts)
Fasten off, leaving a long tail.
Sew any remaining hole closed in your crochet pig pattern. Thread a long tapestry needle with the tail and poke it all the way through the body until it reaches the face, just above one eye.
Weave the needle through the stitch directly above that eye and pull the yarn through. Then poke the needle across the face of your crochet pig pattern to the stitch just above the other eye and weave the yarn through that stitch.
Return the needle to the first side and gently pull the yarn snug—slowly and carefully—until you like the effect. This will help redefine the pig’s adorable face.
Weave in the end, and your Crochet pig pattern is complete!
Ears – make 2
With Color A, ch 2.
R1: Work 3 sc in the 2nd ch from hook. TURN. (3 sts)
R2: Sc in each stitch across. TURN. (3 sts)
R3: Sc in the first stitch, 2 sc in the next stitch, 3 sc in the last stitch. TURN. (6 sts)
R4:. Sc in the first stitch, 2 sc in each of the next 2 stitches, sc in the next stitch, sc dec. TURN. (7 sts)
R5: Sc in the first 3 stitches, 2 sc in the next stitch, [sc and hdc in the same stitch], 2 dc in the next stitch, dc in the following stitch. TURN. (10 sts)
R6: Sc in the first stitch, 2 sc in each of the next 2 stitches, sc in the next 4 stitches, sc dec, dc in the next stitch. TURN. (11 sts)
R7: Sc dec, sc in the next 5 stitches, dc in the next stitch, dc dec. TURN. (9 sts)
R8: Sc dec, sc in the next 3 stitches, dc in the next 2 stitches, dc dec. TURN. (7 sts)
R9: Sc dec, sc in the next 2 stitches. FO, leaving remaining stitches unworked.
Tip: The top of the ear will naturally curl forward—let it. On the opposite ear, flip the curl so it goes the other way to create a distinct left and right ear.
If the ears resist uncurling, you can lightly block them before sewing to relax the stitches.
Sew the long edges (last rows) of each ear to the sides of the head, around round 17—leaving about 4–5 rounds of sc between the eyes and the ears.
Crochet Pig Pattern Legs – make 4
With Color A, ch 2 or start with a magic loop.
R1: Work 7 sc in the 2nd ch from hook. (7 sts)
R2: 2 sc in each stitch around. (14 sts)
R3: Sc in each stitch around. (14 sts)
R4: 2 sc in the first stitch, sc in the next stitch; repeat around. (21 sts)
R 5–8: Sc in each stitch around. (21 sts)
R9: 2 sc in the next stitch, sc in the next 3 stitches; repeat around, then sc in the last stitch. (26 sts)
R 10–12: Sc in each stitch around. (26 sts)
R13. Sc in the first 21 stitches, sl st, TURN. (21 sts)
R14. Sc in the next 10 stitches. (10 sts)
FO, leaving the remaining stitches unworked and a long tail for assembly.
Finishing: Stuff each leg firmly. Sew the legs to the body with the last row of each leg facing outward. Pin the legs in place first to adjust for balance and symmetry—this will determine whether your pig can stand on its own. Congrats you are now the proud owner of your crochet pig pattern. I would love to hear it’s name.