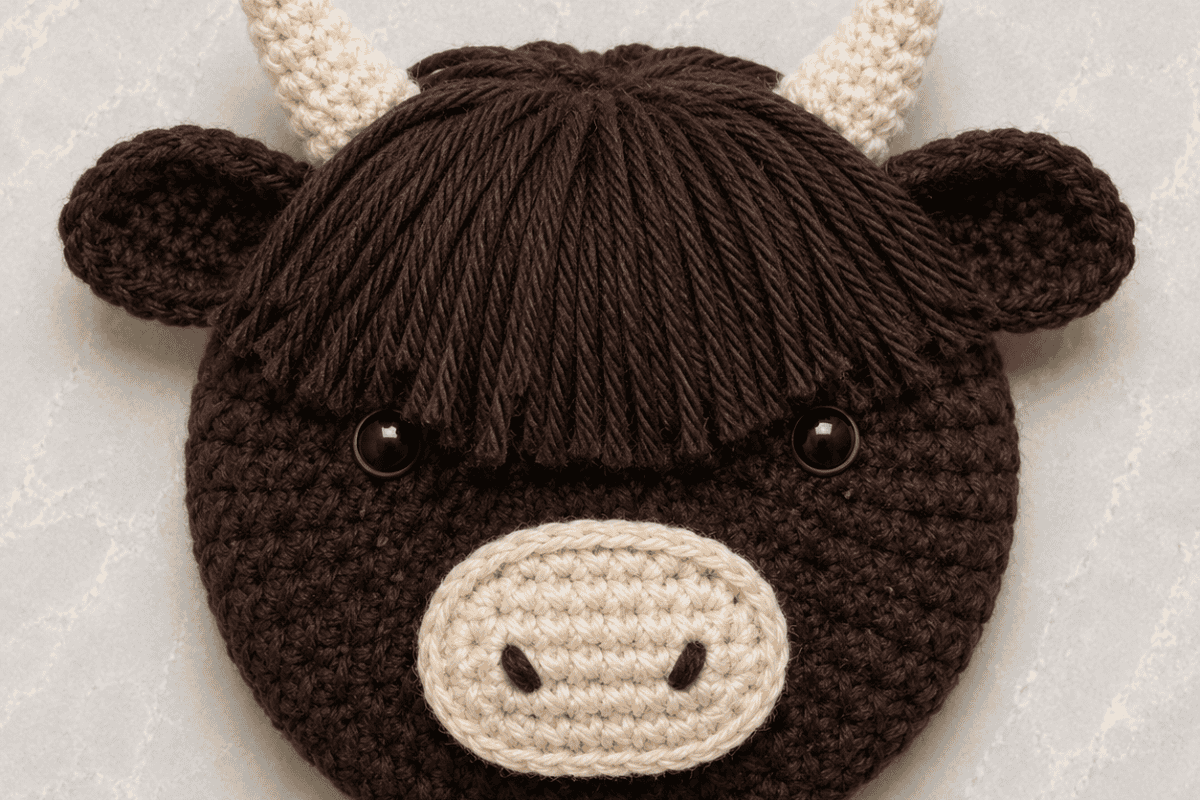
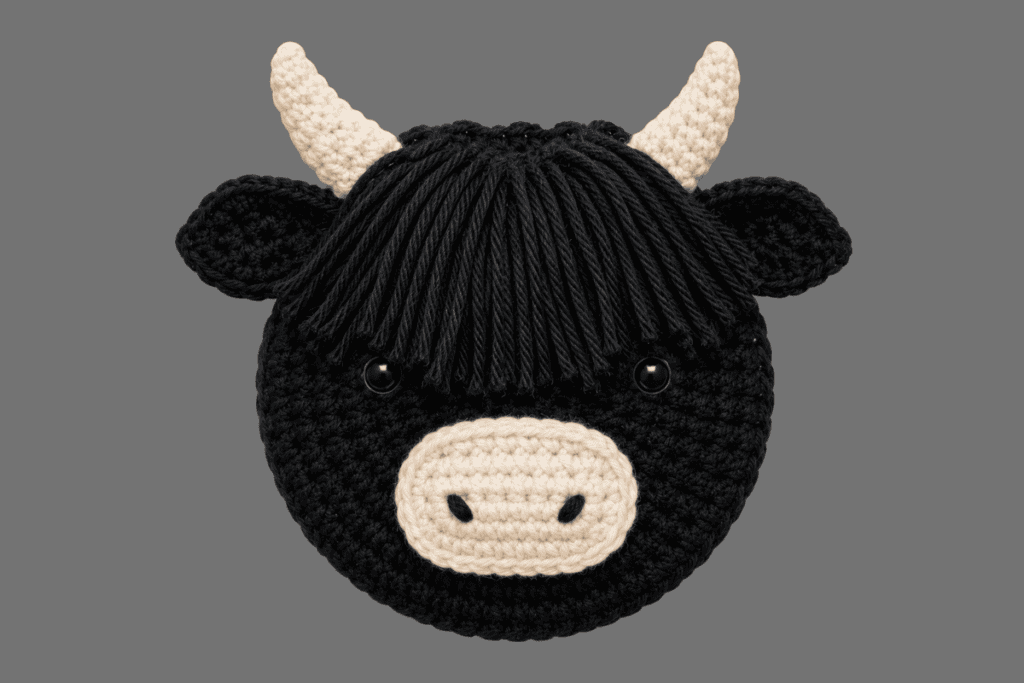
Highland Cow Coaster Crochet Pattern
If you love crochet projects that are equal parts practical and adorable, you’re going to fall head over heels for this Highland Cow Coaster crochet pattern! There’s just something irresistible about those shaggy bangs, sweet little noses, and charming horns that make Highland cows one of the most beloved farmhouse-inspired designs in the crochet world. And now, you can bring that rustic charm right into your home with a fun and beginner-friendly coaster pattern that’s as cute as it is useful.
Whether you’re a longtime crochet enthusiast or just looking for a quick weekend project, this Highland Cow coaster is the perfect make. It works up quickly, uses only small amounts of yarn, and creates a finished piece that’s guaranteed to make people smile. Plus, let’s be honest—who wouldn’t want their morning coffee sitting on the face of an adorable fluffy cow?
One of the best things about this crochet coaster pattern is its versatility. Make one as a whimsical addition to your own coffee table, or create a whole herd in different colors for a coordinated farmhouse set. Traditional Highland cows are often seen in rich reddish-brown shades, but this pattern looks equally adorable in black, chocolate brown, cream, gray, or even playful fantasy colors if you want to get creative. They also make thoughtful handmade gifts for cow lovers, farmhouse décor fans, or anyone who appreciates quirky crochet creations.
This pattern is designed to be approachable and enjoyable, even if you’re newer to amigurumi-style crochet techniques. You’ll use simple stitches like single crochet, half double crochet, and double crochet, along with easy assembly to bring your Highland cow to life. The shaggy fringe is what truly gives this little coaster its personality, and don’t worry—it’s much easier to create than it looks! Adding the fluffy forelock is a simple finishing touch that transforms a basic crocheted circle into an unmistakably adorable Highland cow face.
Because this version has been slightly upsized, the finished coaster has a nice substantial feel—large enough to actually protect your surfaces while still maintaining that cute decorative look. It’s the perfect blend of functional and fun, which is exactly what makes handmade crochet projects so special.
So grab your favorite yarn, your crochet hook, and maybe a warm cup of coffee (you’ll need a coaster soon, after all!). Whether you’re making this for yourself, gifting it to a friend, or adding it to your next craft fair table, this Highland Cow Coaster is sure to become a favorite project.
Let’s get started and crochet the cutest little Highland cow to ever guard your coffee mug!
Check out Today’s FREE Crochet Pattern:
Materials and Supplies
- Worsted Weight Yarn (brown or black, cream)
- Size 5 hook
- Scissors and needle to sew pieces
Pattern PDF
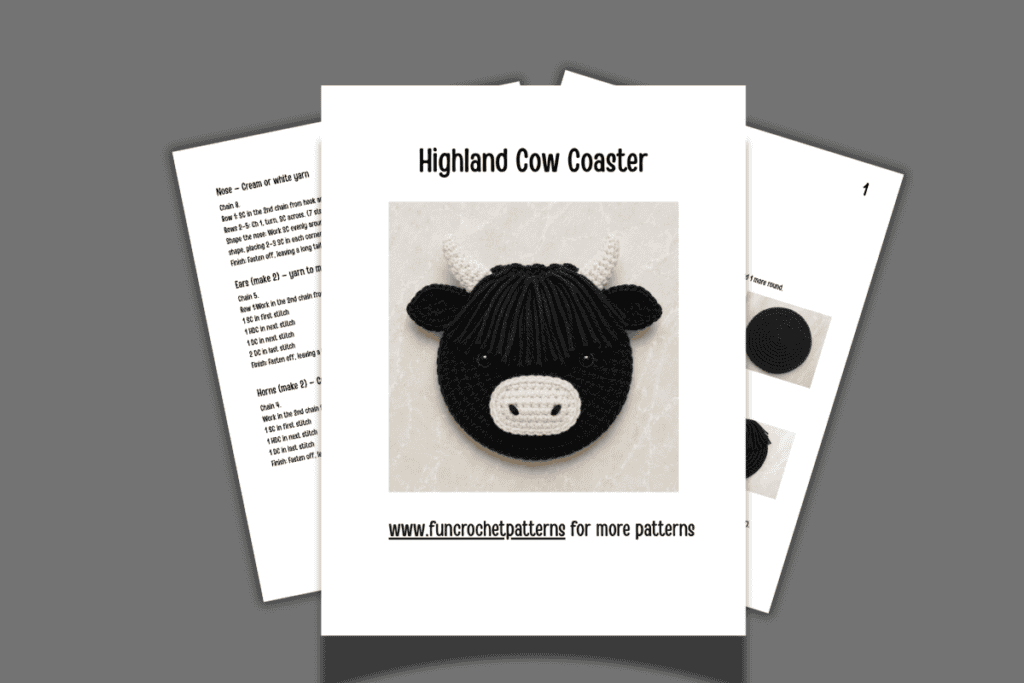
Create Your Highland Cow Coaster Crochet Pattern
I have written this in pieces so you can easily see each section. I have also created a great PDF for the Highland Cow Coaster Crochet Patternso you can download it and use it again and again. The PDF pattern has more photos of each step.
Head Instructions
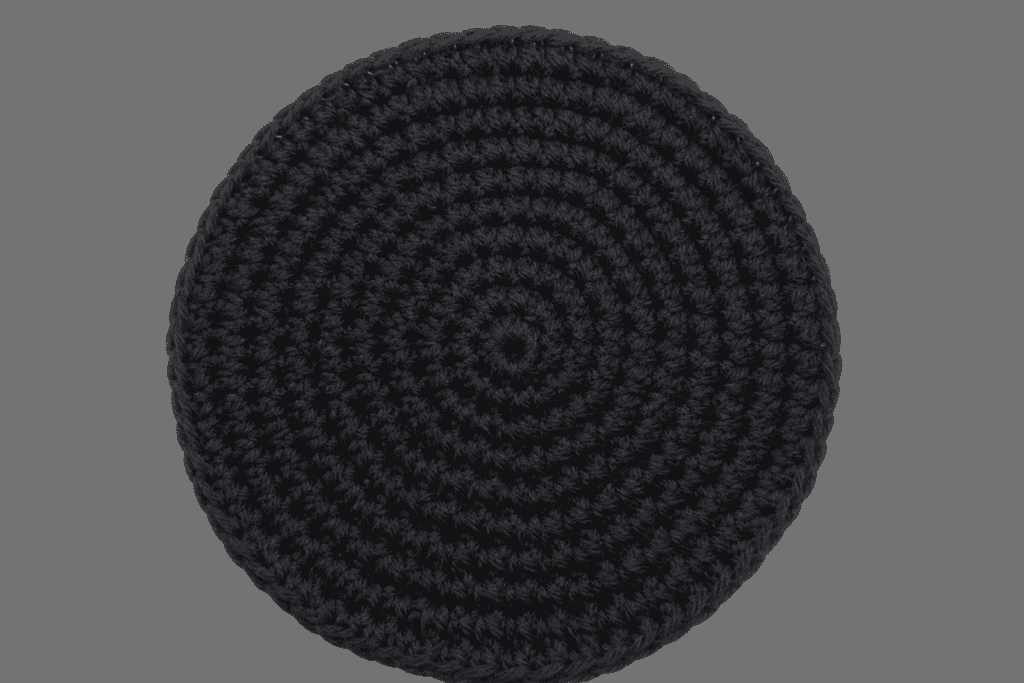
If you want your Highland Cow Coaster Crochet Pattern slightly bigger simply add 1 more round.
Using your yarn, make a magic ring.
Round 1: 6 SC into the magic ring. (6 sts)
Round 2: 2 SC in each stitch around. (12 sts)
Round 3: 1 SC in next stitch, 2 SC in next stitch repeat around. (18 sts)
Round 4: 1 SC in next 2 stitches, 2 SC in next stitch repeat around. (24 sts)
Round 5: 1 SC in next 3 stitches, 2 SC in next stitch repeat around. (30 sts)
Round 6: 1 SC in next 4 stitches, 2 SC in next stitch repeat around. (36 sts)
Round 7: 1 SC in next 5 stitches, 2 SC in next stitch repeat around. (42 sts)
Fasten off and weave in ends.
Adding the Fringe to your Highland Cow Coaster Crochet Pattern:
Cut the yarn:
Cut several strands of yarn, each about 2–3 inches long.
Fold each strand:
Take one strand and fold it in half to make a loop.
Attach the strand:
Insert your crochet hook through a stitch along the top center edge of the crocheted head.
Hook the folded loop and pull it halfway through the stitch. Secure it:
Pull the two loose yarn ends through the loop, then pull snug to tighten (just like attaching fringe to a scarf).
Repeat:
Continue adding strands across the top center until the fringe looks as full and fluffy as you like.
Trim and shape your Highland Cow Coaster Crochet Pattern:
Trim the ends evenly, or leave them slightly uneven for a more natural Highland cow shaggy look.
Nose — Cream or white yarn
- Chain 8.
- Row 1: SC in the 2nd chain from hook and in each chain across. (7 sts)
- Rows 2–5: Ch 1, turn, SC across. (7 sts each row)
- Shape the nose: Work SC evenly around the entire rectangle to soften the edges and create an oval shape, placing 2–3 SC in each corner as needed to keep it smooth.
- Finish: Fasten off, leaving a long tail for sewing
You are already nearly 3/4 of the way finished on your Highland Cow Coaster Crochet Pattern.
Ears (make 2) — yarn to match your cow
- Chain 5.
- Row 1: Work in the 2nd chain from hook:
- 1 SC in first stitch
- 1 HDC in next stitch
- 1 DC in next stitch
- 2 DC in last stitch
- Finish: Fasten off, leaving a long tail for sewing.
Horns (make 2) — Cream, tan, or light gray yarn
- Chain 4.
- Work in the 2nd chain from hook:
- 1 SC in first stitch
- 1 HDC in next stitch
- 1 DC in last stitch
- Finish: Fasten off, leaving a long tail for sewing.
You have all the pieces for your Highland Cow Coaster Crochet Pattern. How it’s time to assemble it and use it for your favorite drink.
Assembly Your Highland Cow Coaster Crochet Pattern:
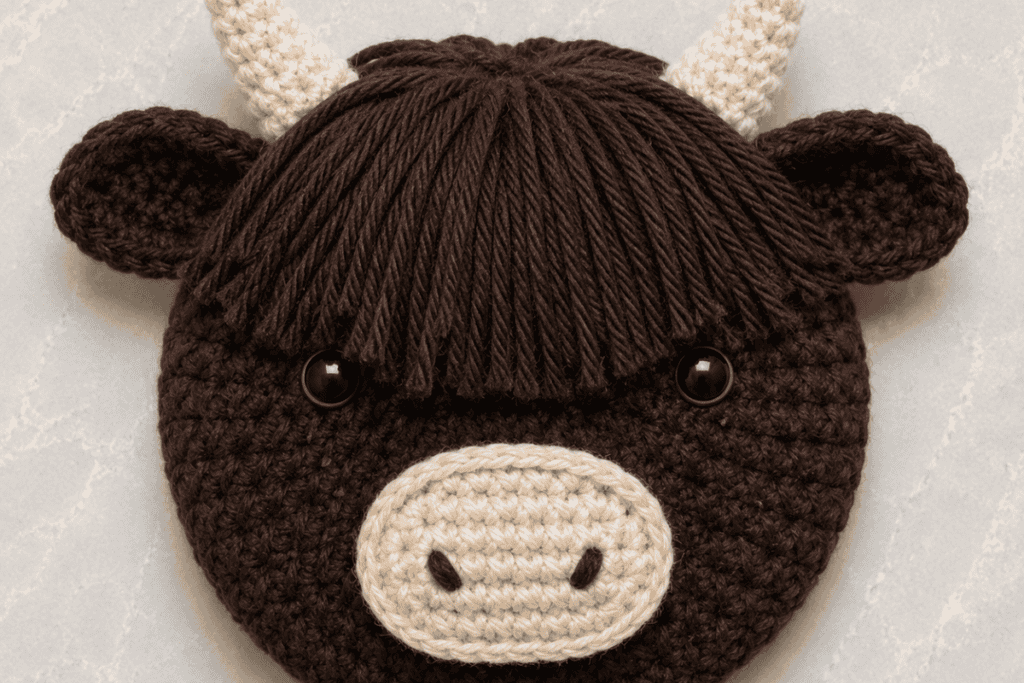
- Attach the nose:
Sew the nose to the bottom center of the head. - Attach the ears:
Sew one ear to each side near the top of the head, slightly angled outward. - Attach the horns:
Sew the horns just above or slightly in front of the ears. - Add the eyes:
Attach safety eyes in your desired position, or embroider the eyes using cream yarn. - Embroider the nostrils:
Using black yarn, embroider two small nostrils onto the nose. - Final shaping:
Adjust the fringe, ears, and horns until your Highland cow looks just right.
If you love Highland Cows, I do have a free Highland Cow pattern