How To Hold Crochet Yarn: Tutorial For Beginners
If you’re new to crocheting or finding it challenging to know how to hold crochet yarn properly, you’re not alone. Holding the yarn correctly is crucial for both comfort and efficiency.
In this guide, we’ll explore various tips and techniques to help you master the art of holding yarn while crocheting.
It’s important to remember that there’s no one-size-fits-all approach to holding yarn. What works for one person may not work for another, so it’s essential to find a grip that feels comfortable and natural for you.
Experimenting with different grips can help you discover the most suitable method for longer and more comfortable crocheting sessions.
Maintaining the right tension is also key in crocheting. Your yarn should be held securely enough to prevent slipping, yet not so tight that it becomes difficult to work with.
Achieving the correct tension may require some practice, but it’s well worth the effort to ensure a neat and professional-looking finished product.
In the following section, we’ll delve into specific techniques for holding yarn that can assist in achieving the right tension and enhancing your crocheting skills.
Table of Contents
How To Hold Crochet Yarn
Properly holding the yarn is essential in crochet to ensure that your stitches turn out as desired. There are various ways to hold yarn, and discovering the most comfortable method for you is paramount.
Firstly, you need to determine which hand you will use to hold the hook and which hand you will use to hold the yarn.
Typically, if you are right-handed, you will hold the hook in your right hand and the yarn in your left hand. Conversely, if you are left-handed, you will hold the hook in your left hand and the yarn in your right hand.
The most common method of holding yarn is the “knife hold,” which involves wrapping it around your index finger, over your middle finger, and under your ring finger and pinky finger. However, this may not be the most comfortable approach for everyone.
Another technique is the “pencil hold,” where you wrap the yarn around your little finger, over your ring finger, under your middle finger, and over your index finger.
There are different finger positions that can adjust the yarn tension. Some individuals prefer using their non-dominant hand to hold the yarn, while others use their dominant hand.
It’s important to note that there is no one-size-fits-all method for holding yarn in crochet. The primary ways are the knife hold and the pencil hold, but you can experiment with different positions to find what suits you best. With practice, holding the yarn will become second nature.
How To Hold Crochet Yarn: Knife Hold
The knife hold, favored by crocheters who also knit, entails holding the crochet hook like a knife, with the hook pointing upward and your thumb positioned on top of the hook.
Subsequently, you wrap the yarn around your fingers and secure it against your palm with your pinky finger. This grip provides significant control over your hook and can be advantageous when working with finer yarns.
How To Hold Crochet Yarn: The Pencil Grip
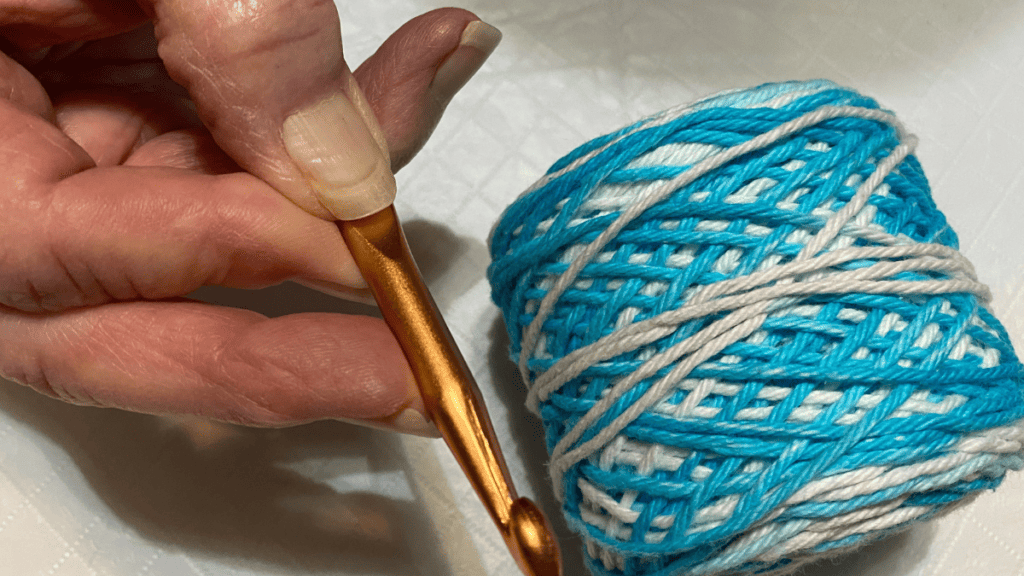
Another frequently employed hold by crocheters is the pencil grip. When using this technique, you hold the hook like a pencil, with the hook pointing downward and your thumb and index finger grasping the hook.
Subsequently, you wrap the yarn around your fingers and secure it against your palm with your pinky finger. This hold may be comfortable for individuals accustomed to writing or drawing with a pencil.
How To Hold Crochet Yarn: The Knife Grip
The knife grip closely resembles the knife hold, but instead of holding the hook like a knife, you hold it like a pencil with the hook pointing upward.
Your thumb rests on the flat part of the hook, and you wrap the yarn around your fingers and secure it against your palm with your pinky finger. This grip can be advantageous for individuals who find the knife hold uncomfortable.
How To Hold Crochet Yarn: The Pencil Hold
The pencil hold is akin to the pencil grip, but instead of holding the hook with your thumb and index finger, you hold it with your index and middle fingers.
This grip can be beneficial for individuals who find the pencil grip uncomfortable or wish to experiment with a different approach.
How To Hold Crochet Yarn: The Pen Hold
The pen hold closely resembles the pencil hold, but in this variation, you hold the hook with your thumb and middle finger instead of your index and middle fingers.
This grip can be beneficial for individuals who find the pencil hold uncomfortable or wish to explore an alternative technique.
Numerous other yarn holds are available for experimentation, including the ring hold, the underhand hold, or the overhand hold.
Each hold may provide distinct advantages based on your individual preferences and the specific project you’re undertaking. Feel free to explore different holds and determine which one best suits your needs.
Here’s a video to help you with your holds.
Mastering Yarn Tension
Achieving the right tension in your yarn is crucial for producing a beautiful and uniform crochet project. The tension of your stitches is influenced by how tightly or loosely you hold your yarn while crocheting. Here are some guidelines to assist you in mastering yarn tension:
Begin by learning the appropriate method for holding your yarn. There are various ways to hold your yarn, with the most common being to wrap it around your fingers.
Experiment with different techniques until you find the most comfortable and effective one for achieving the desired tension.
Consistent practice is key. The more you crochet, the more adept you will become at holding your yarn and maintaining proper tension. Don’t hesitate to unravel your work and start anew if your tension is inconsistent.
Be mindful of your crochet tension as you work. If your stitches are too loose, your project may appear untidy and irregular.
Conversely, if your stitches are too tight, your project may become rigid and challenging to work with.
Make adjustments to your tension as necessary. If you notice that your tension is too loose, try holding your yarn tighter or using a smaller crochet hook. Conversely, if your tension is too tight, attempt holding your yarn looser or using a larger crochet hook.
Take into account the weight of your yarn. Different yarn weights require varying levels of tension. For instance, a bulky yarn may necessitate looser tension compared to a fine yarn. Experiment with different yarn weights to determine the tension that best suits your style.
By mastering yarn tension, you’ll be able to consistently create beautiful and uniform crochet projects. Keep honing your skills and experimenting until you find the ideal tension that works for you.
Crochet Basics
Now that you’re prepared to practice your crochet stitches and embark on your first crochet project, it’s essential to understand how to hold yarn and the crochet hook correctly. This will aid in creating uniform stitches and minimizing hand fatigue.
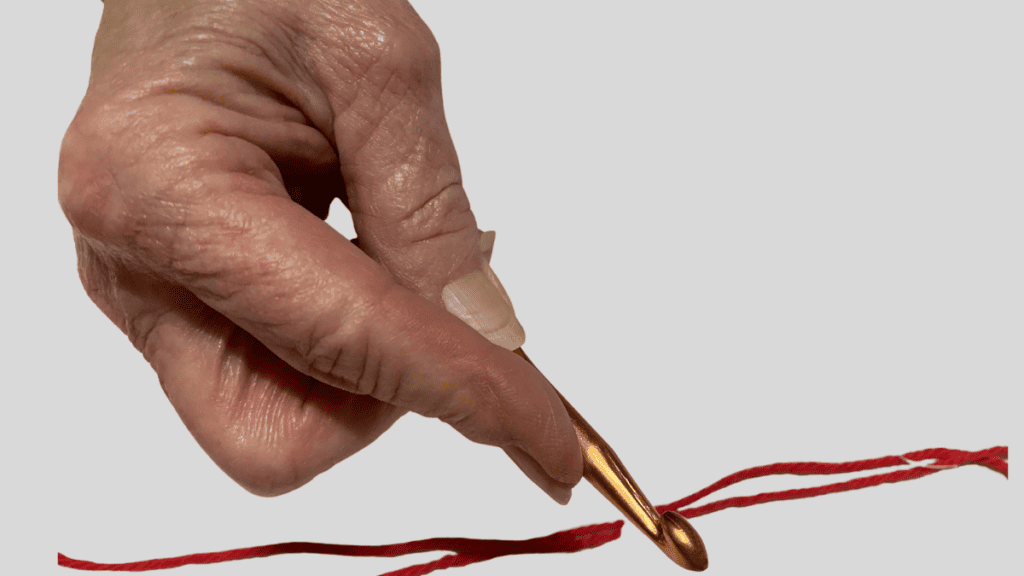
To begin, you’ll need to create a slip knot. Hold the tail end of your yarn in your left hand and form a loop.
Insert your hook into the loop and draw the hooked end of the yarn through the loop. Tighten the knot by pulling the tail end of the yarn.
Subsequently, hold the crochet hook in your right hand like a pencil, with your thumb and index finger gripping the hook and your other fingers resting on the thumb rest.
Hold the working yarn in your left hand, wrapping it around your pinky finger and over your index and middle fingers.
To produce a chain stitch, insert your hook into the slip knot and pull the working yarn through the loop. Repeat this process, pulling the yarn through each loop to form a chain.
When working on your crochet project, ensure that you pull the yarn tightly to create even stitches. If you pull too loosely, your stitches may become uneven, resulting in a messy-looking project.
Always remember to work with the right side facing you. This will guarantee that your stitches appear neat and orderly.
Armed with these fundamental techniques, you’re prepared to embark on your initial crochet project! Feel free to experiment with various yarns and patterns to craft a distinctive and exquisite project. Best of luck!
Overcoming Challenges in Crochet
Crocheting is an enjoyable and calming pastime, yet it can present its own share of obstacles. Here are some typical challenges you might encounter along with suggestions for surmounting them.
Yarn Weights
Selecting the appropriate yarn weight for your project can be challenging. Using yarn that is either too thick or too thin can impact the overall appearance and texture of your project.
The most effective way to address this is to verify the yarn weight specified in your pattern and opt for a yarn that aligns with that yarn weight.
Tension Problems
Struggling with tension issues can be discouraging, particularly for beginners. When your stitches are either too tight or too loose, it can impact the size and form of your project.
The key to achieving the correct tension is consistent practice. Keep practicing until you discover the tension that suits you best.
Muscle Memory
Muscle memory plays a vital role in crochet, aiding in the maintenance of consistent tension and stitch size. The more you practice, the better your muscles will recall the movements, making the process easier over time.
Ergonomic Hooks
Opting for ergonomic hooks can alleviate wrist discomfort and enhance the comfort of crocheting. Seek out hooks with a comfortable grip and designed to minimize strain on your wrist.
DK Weight
DK weight yarn is a favored option for crochet projects due to its versatility and extensive color range. When using DK weight yarn, be sure to verify the recommended hook size for the yarn. Using the incorrect hook size can impact the drape and overall appearance of your project.
Keep in mind that crochet is an enjoyable and fulfilling hobby. Don’t be disheartened by any challenges you encounter along the way.
With practice and more patience, you can overcome any obstacle and craft beautiful crochet projects.
Tips for Crocheting
For experienced crocheters aiming to enhance their skills, there are several crochet techniques worth mastering. One straightforward method to elevate your crochet work is by utilizing a larger hook.
Furthermore, this can result in a looser, more relaxed tension, particularly beneficial for tight crocheters or those experiencing joint discomfort.
Another transformative approach is to explore different yarn types. Bulky yarn can produce a distinctive texture and is ideal for crafting cozy blankets and scarves.
If tension is a challenge, consider using a double strand of yarn to create a thicker, more forgiving crochet fabric.
In terms of holding your hook, position the body of the hook in the flat area between your thumb and index finger, while using the top of your hand to guide the hook.
If your pinkie finger becomes fatigued or sore, try resting it on your work for added support.
Crochet Patterns
Here are just a few crochet patterns to try now that you have the hang of holding your crochet hook and mastering basic crochet stitches.
One Comment